Tag Archives: sous vide

Best Ever Sous Vide Butternut Squash

IMG_7509
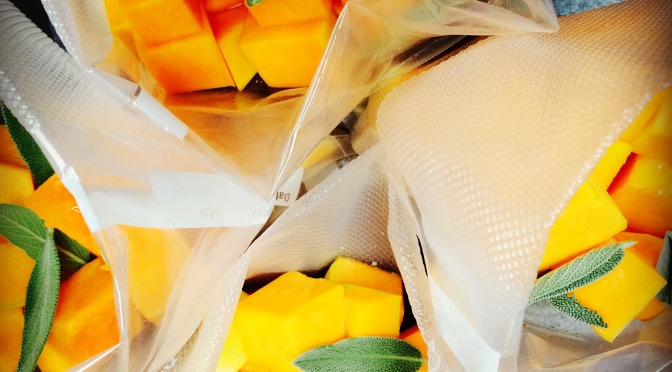
When it’s chilly outside I keep plenty of this butternut squash lightly flavored with sage stocked in my fridge.  It takes minutes to prepare and the bags will keep a good month or even more in your fridge.  You can serve it as a side all by itself, put it on a fall salad, toss with some barley or farrow, add it to risotto or heat it up with some chicken stock and toss in the blender for a fast weeknight soup.

IMG_2703

For those of you who “follow me” I realize there hasn’t been much to follow recently.
Sorry I’ve been MIA lately but our kitchen currently looks like this.  We are in the exciting (terrifying) process of rebuilding our home!  Oh the joy of the Los Angeles Department of Building and Safety, the fights between our contractor and our architect, the money draining from our bank account at a startling rate.  I could go on for days, but of course you’re here for the food.

Butternut squash is pretty much at the end of the season but you can still find it in the market in some areas and for some reason Trader Joe’s never seems to run out of the stuff! Most conveniently they’ve got it already peeled and chopped into perfect cubes for you so by all means take the shortcut.  I like to make things more difficult than they need to be so I instead shlep to the farmer’s market for the squash and then peel and cut myself.  I also walk uphill in the snow the entire way.

I do these in large batches and so that I have a good stock on hand.  It’s my daughter’s absolute favorite side and I find it incredibly versatile.

Here’s the super complicated (and by complicated I mean my 7 year old could do it) directions:

IMG_1979

  1.  Preheat the Sous Vide to 180.  If you are serving right out of the bag and want them less firm cook at 185.  I like them more firm so that they reheat well.
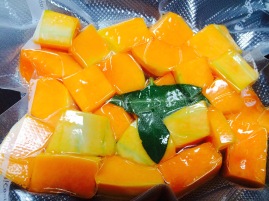
  2. Chop the peeled squash into cubes
  3. Put them into food saver bags
  4. Add 1 or 2 leaves of sage
  5. Add a pinch of salt
  6. Add a very small drizzle of olive oil
  7. Vacuum seal the bags
  8. Put in the preheated water bath.
  9. Pour yourself a glass of wine and watch some TV for 45 minutes to an hour
  10. Remove from the bath and refrigerate till ready to use


Goodness in a bag. Orange honey ginger chicken sous vide

20140213-203146.jpgIt was the kind of day makes a mommy want to crawl into the worlds largest martini and google “boarding school.” Is kindergarden too early? Luckily I have a freezer full of the ultimate comfort food. My orange honey ginger chicken sous vide (and a glass of wine) comes to the rescue with its syrupy sweet goodness ready in minutes.

I make these in large batches and freeze them for emergencies and every day meals when there’s no time to cook.   It seems fancy so totally appropriate for a dinner party, all kids and adults love it, and it’s ready in about 15 minutes.  Ding, ding, winner!  Here’s what I do:  I spend an hour or less one afternoon preparing all the bags to go into the sous vide, I keep them in the bath overnight (6-8 hours) and in the morning plunge into a ice bath then toss them straight in the freezer. That’s all it takes to have several weeks worth of meals in the bag.

Step One – marinate the meat

IMG_5022


Marinate skinless, boneless chicken breasts in enough orange juice to cover. Leave them in the fridge for 30 minutes to 2 hours.  I had tangerines and blood oranges so that’s what I used, but I normally use just regular old OJ.


Step Two – prep the water bath

Prep your water bath and set the temp to 145.

Step Three – prep the bagsIMG_5028

I use a food savor but you could also use ziplock bags. If you opt for ziplock, make sure to use freezer bags and the old fashion click type, not the zipper type closure.

Put a few slices of orange, one slice of ginger about an inch long, a tablespoon of honey and one small pad of butter in each bag.

Step Four – bag and seal the meat

IMG_5056Take the chicken out of the marinade, do not rinse, and place one breast (or breast portion if you have portioned your breasts up for smaller serving sizes. I find that each breast is 2 or 3 portions for us, but we don’t eat much meat). Add a sprinkle of salt and pepper to each bag and vacuum seal. If using ziplock bags you will need to submerge the bags in the water bath almost to the top of the bag and carefully seal them as close to,the waterline as possible. The pressure of the water will force out the air.

Step Five – put in water bath for 4-8 hours

Step Six – submerge in ice for 5 – 10 minutes

Step Seven – put in freezer for later use or go directly to step eight

Step Eight – thaw the bag in a bowl of water

Step Nine – make the sauce

In a skillet melt a couple of tablespoons of butter.  Add to it a a 1/2 cup of OJ, then pour in a couple of tablespoons of honey and a pinch of salt.  Stir continuously over high heat until it starts to bubble up.   taste and adjust with extra honey, salt or juice as needed.

Step Ten – add the chicken to heat through

Add a chicken breast (and a couple of peeled tangerine sections if you have them) and cover for a couple of minutes, turn the chicken breast and cover for another couple of minutes.  Then take of the lid and if the sauce is too thin just remove the chicken, turn up the flame and let it bubble for a few minutes.  The sauce should be thick and syrupy.

IMG_5377For valentines day I did a variation on this using blood orange juice and topping with pomegranate seeds.

Freaking fantastic sous vide asparagus

IMG_4968I had never even considered cooking asparagus sous vide.  After all it doesn’t need to be cooked for a long time, it’s easy enough to steam and I didn’t really see the need to infuse it with other flavors.  That all changed the other day when I was doing a large batch of veggies, it was time to cook dinner and I realized it would be easier to just vacuum pack my stalks and toss them in the pot.  I simply can not believe the difference in flavor.  They are more intense and more mild at the same time.  They actually taste fresher for lack of a better term.  I will not be hauling out the water bath every time I want to make some nice asperagus but if I’m already cooking sous vide I will certainly toss in some of these wonderful stalks and enjoy.

Step One – heat up sous vide water bath to 185

Step Two – Add asparagus, a drizzle of olive oil and a sprinkle of salt to a bag and vacuum seal.

Step Three – Put in the water for 15 minutes

Step Four – Plunge the bag into ice water for a few minutes.  Open bag and enjoy.  I grated some lemon zest over mine before serving.

Grass Fed Rancher Steak Sous Vide

20140105-153248.jpg

In Los Angeles we have an incredible butcher named Lindy and Grundy.  They carry only organic, local, pasture raised and grass fed meats, but the most unique part is that they are a snout to tail butcher.  Not only is the meat incredibly healthy, only grass fed on 100% organic small farms, but you can get really unique cuts. I feel better about my daughter eating it, and I know it’s sustainably raised so I can feel rather smug about my elitist home cooking.

The cut I was working with today was a rancher steak, also know as heart of the clod.   Although it sounds like a middle school insult, it comes from the shoulder clod and is a tough piece of meat only good for braising. This makes it an ideal cut to sous vide. I’ve never understood people who take an expensive New York and sous vide it. Instead I want to coax flavor and texture from more overlooked cuts that would normally require a lot of time and effort to prepare. My steaks came from the butcher already tenderized with a jaccard so all I had to do was marinate, bag and cook.

20140105-204958.jpgPrepare a marinade of Worcestershire and soy sauce. Place the steaks in a shallow pan and cover with marinade. Refrigerate for 2-4 hours.

Start sous vide warming to 133 (my Nomiku does a more precise temp of 132.7 but 133 will be fine)

20140105-205011.jpgRemove from marinade, season with salt and pepper and place in a food saver bag with sliced onions and mushrooms. I used some trumpet and crimini mushrooms but pretty much anything flavorful would work. Add one pad of butter in the bag and vacuum seal. The butter is critical to the flavor and texture. You won’t get the same result from olive oil. Under my links you can read serious eats steak sous vide primer. It discusses in ore depth the reason that butter is important. I placed mine in the 132.7 water for 16 hours plunged into an ice bath and then froze them for later meals for my daughter. One of the things I love about sous vide as a mom is that I make small portions that are easy to thaw and heat in minutes.

20140105-205058.jpgTo serve I thaw them in the sink, heat an iron skillet to searing hot, add butter and a drizzle of olive oil and sear on both sides. The steak is cooked to medium rare temperature so if you prefer medium or your kids won’t eat pink meat simply cook a bit longer on the skillet. The texture is amazing. Closer to a New York, and the flavor is fantastic.

Sous vide beet carpaccio

IMG_3430I love beets! I love them, but many people don’t. Here’s a beet recipe I came up with that satisfies even the beet haters amongst my friends. It introduces a savory element through thyme infused in a sous vide slow cook. The beets come out perfect every time and it’s a lot less messy than roasting in your oven. They are simply beautiful and will dazzle your dinner guests. I often take these to dinner parties as a starter and they never fail to amaze.

IMG_3441

20140104-131648.jpg
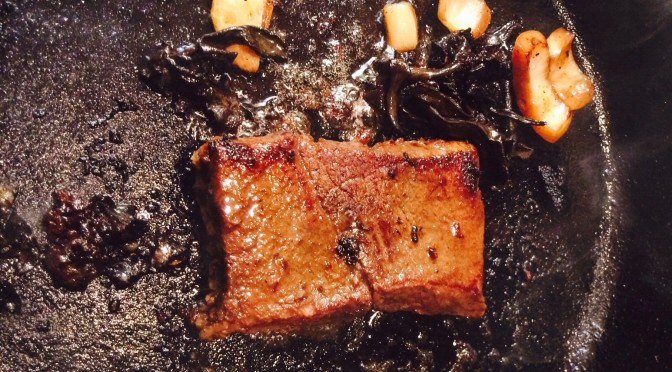
When you serve them always introduce an acid element such as vinegar or lemon juice. I’ve served them simply on a white plate with lemon juice and lemon zest sprinkled on top or I’ve made a micro green salad with them. Here I paired them with humbolt fog goat cheese, micro arugula, baby kale and some walnuts. I lightly drizzled it with a champaign vinaigrette.

Recipe

Preheat the sous vide water bathe to 185.

Peel and thinly slice the beets.

Place in a vacuumed sealed bag with a sprinkle of salt, a drizzle of olive oil and 2 sprigs of thyme.  Vacuum seal the bags and place in the preheated sous vide.

Cook for 2 hours and afterwards immediately submerge in a ice water bath for 10 minutes to stop the cooking process.  If you’re feeling lazy you don’t even need to do this since you’re cooking veggies, it just means they keep cooking so your texture could be slightly less firm than you want. You can serve immediately or keep your little gems in the fridge for a month. They are great right out of the bag but they benefit from added acid and a peppery element such as arugula or just a sprinkle of pepper.

Grandma ‘the butcher’

20130913-215408.jpgAfter a morning hosting my daughter’s 5th birthday party we did what most families do, we butchered a rabbit. Having purchased two wild Scottish hare from a restaurant food purveyor, we now needed to butcher the creatures and then sous vide the bunny parts. My mother is particularly good with a knife so we enlisted her help. I don’t think my daughter is scarred for life by the image of grandma shoving her hand into the bloody caracas of Thumper, but I might be. Don’t go up against grandma in a knife fight kids!

Young adult Thumper thumping his foot from Bambi
Young adult Thumper thumping his foot from Bambi (Photo credit: Wikipedia)

We looked up how to carve up the bunny on the internet and grandma went to town. My vegetarian sister almost threw up when she pulled out the heart, lungs and other bits.  We should have had a plan for those and cooked them up in some amazing gourmet interpretation of offal, but we had no idea what to do, so we just roasted them for our very lucky dog.

One thing to note.  Don’t start a process like this without a LOT of time on your hands.  We were really rushing things at the end and it was not ideal.   Here’s the thing,  bunny parts are small.  Very small.  They are hard to work with and for us non butchers hard to identify.  We had a little assembly line going with Grandma cutting up the parts.  My husband and I bagging them and putting in other ingredients then vacuum sealing with the food saver.

We put some in bags with wine, garlic, and rosemary.  Some got a beer and mustard mix with garlic.   Some just got salt and pepper and a dash of olive oil.  We put olive oil in all of them because the rabbit is such a lean meat.  Then we put in the sous vide.  We tossed it all in a bath at 145 (I think) but we left them in way way too long.  We left them in overnight  if memory serves but to be honest with all the present unwrapping and kids melting down I’m not entirely sure.  I somehow lost my notes in the process so I’m sort of winging it (did I mention that I’m a fairly shitty scientist?)   What I do know is that the taste was amazing but the texture was not.  Most of the parts were too soft although the legs and thighs were quite nice.  Turns out  it’s important to correctly identify the parts and cook them separately and at different temps.   Something called the “saddle” apparently doesn’t sous vide well at all.  I suppose I should have made a rabbit stew with all the bits that are too delicate to sous vide, but did I mention this was the day of my daughter’s birthday party?

Stefan’s Gourmet Blog did a great rabbit test  and he concluded that for farmed rabbit 8 hours at 165 was like a traditional braise.   Next time I will listen to Stefan!  I was cooking wild hare, not farmed rabbit so it would be more tough to begin with and would require more experimentation.  We had very very mixed results and because I can’t find my notes we’re going to have to repeat this the next time grandma comes to town and we feel like traumatizing my sister.

I’d chalk this one up to a fail…but a really tasty fail.  What I can say for sure is that the red wine, garlic and rosemary was fantastic as was the beer and mustard mix.  Both equally tasty and I’d do it again but only with the legs and thighs.

Octo-fest!

Sorry i have been taking a mothers day break so I haven’t been writing and this has been sitting in my drafts folder all week.

Tuesday night 4 people devoured an entire 6 lb octopus. The conclusion is that 19 hours in the sous vide at 165 was amazing but next time we will stop some at 12, some at 14 and some at 16 to compare. 19 hours was so tender it was amazing in salads and just eaten cold but it presented problems on the grill. the skin had become so gelatinous it stuck impossibly to,the grill and the meat didn’t have enough left to hold up. We did carpaccio with sriracha and lime but it was so soft we could not get a true think carpacio. the taste was fantastic but presentation was off a bit. We served some cold on arugula salad, with lemon and olive oil. The best was thinly sliced with lime and sriracha rooster and sliced jalapeño peppers. I will be getting another octopus very soon. Sorry for the lack of pictures but we could not start till my four year old went to bed so it was dark and the pictures were not appealing. Fear not we will do this again and I will have better presentation and pictures.

Sous vide success !

The 19 hour sous vide octopus is a smashing success! We took out one of the yummy umami tentacles and simply sliced it over some lemon, sprinkled with paprika and chowed down. It is fantastic. Perfect texture! We also got out our sriracha and dabbed some on top because we thought it could use some heat. We have tons of ideas for this and we are having some friends over tomorrow to try our little experiment. Check out Wednesday for the update.

20130506-213158.jpg

Blame it on the Wine!

Last night I had my first big flop in molecular gastronomy. I wanted to make mozzarella spheres but I had a couple of problems. #1 we had gone out to dinner with the kids and had some wine, got my daughter to bed late and got started around 9PM after some wine and cocktails. #2 my scale died. Note to self – never ever attempt molecular gastronomy without a scale. I know it might seem intuitive that just winging it isn’t something you should do with anything starting with the word molecular but I really really wanted to do it and thought it would be a good experiment. Today my husband gave me a crash course in our sous vide supreme and we prepared a sous vide of octopus. I will post about that later. In the mean time I’ve got a little sodium algenate mess to clean up and a fridge full of liquid mozzarella.

20130914-205727.jpg

2 creative directors sous vide an octopus

IMG_3506It was Sunday and I had someone take our 4 year old to a carnival so we had several hours to ourselves. Did we watch a movie? Go out to dinner? Take a nap? Take a passionate roll in the sack? No we decided it was the perfect time to experiment with a 6 pound octopus and take pictures of it.

Several months ago we had an amazing octopus carpaccio at a restaurant. They had cooked the octopus in a sous vide and then sliced it very thinly on a plate with some micro greens, lemon and I think paprika. We have been talking about making it ever since.

We ordered a frozen spanish octopus and were expecting to get a 3-4 pounder but what came in the mail was a 6 pound monster that sat in our fridge defrosting for a couple of days.

IMG_3491
We roved the internet for a while to find some videos of people breaking down an octopus. Since our was frozen and not fresh we fortunately didn’t need to “clean” it and take all the ink and yucky inner stuff out of it’s head. Yes if you buy a fresh one from a fish monter you will need to slice open it’s head and pull out all the gunk inside. We pulled out Flavio (I named him of course. Doesn’t everyone name their food?) and put him on a cutting board. Eye side up and then we cut out the beak. This is about as appealing as you might think. That little black thing is an actual beak!

IMG_3527
We then flipped it over and cut out the eyes. Fortunately I’d made us a batch of my yummy blackberrry gin coolers. It’s a squirt of home made blackberry syrup which I did with some Thyme, lime, gin, mint and club soda. They helped me deal with all the gushy octo parts and the intense fish smell.

After that we cut off the head and cut apart all the tentacles. Once broken down we washed it in the sink and dried it off with a clean towel. Now we were ready to put in our food saver bags and get into the sous vide. We added just salt, lemon and olive oil to some, added oregano to the mix for others and finally did some with paprika, olive oil, lemon and oregano.

IMG_3611

We placed them in the sous vide at 165 and checked them in 7 hours and they still were not tender so we left them in overnight! We had intended them to take them out as soon as we got up but our daughter had a melt down and getting her ready for preschool was harder than breaking down the octopus so I completely forgot about it. When I started planning dinner I suddenly remembered we had an octopus that had been in the sous vide for 19 hours and I ran to take it out. It was pink in the bag, nice and tender but amazingly still in tact. The tentacles have shrunk to more than half their size and are now swimming in lots of pink liquid. I popped them in the fridge and later I’ll put some in the freezer for a later date, but that 6 pound octopus looks like it will feed 4-6 for dinner, but as the intended carpaccio it should be enough to make appetizers for 2 to 3 diner parties. We will try some tonight and tomorrow we will make the carpaccio. More pictures coming on my tumbler feed!

IMG_3615

This slideshow requires JavaScript.